How to Protect Motherboard with Intel Microcode Boot Loader?
Nowadays, your computer plays a vital role in your life, but due to many viruses or online threats, you need to protect your computer. Protection of computer always requires full attention whenever there is vulnerability out in the wild. But now your motherboard can also be affected by these online threats. While the two most dangerous hardware infections these days are Spectre and Meltdown, and these two can inject themselves in the Intel’s motherboards, more so than the others. These hardware infections can also allow the application access to the memory locations, and that’s not good for your motherboard.
So, here the questions arise that how does anyone protect their Intel Motherboard from the attacks of today and those of the future? To solve the problem of Motherboard, recently we find an amazing tool called as Intel Microcode Boot Loader. However, we all know that newer computer is much proficient in protecting hardware from any infections. So the Intel Microcode Boot Loader tool will be more useful for all the older computers where any manufacturer no longer offers security updates.
Always remember that the Microcode Boot Loader is completely based on the Intel BIOS Implementation Test Suite and will only work properly from a USB drive which is FAT32 formatted.
Let’s discuss here how the Intel Microcode Boot Loader works to protect the Mother board of your computer system.
Steps to Protect Motherboard with Intel Microcode Boot Loader
Before running the program, you need to do the below-given things:
1. Download and Format
2. Create Bootable Drive
3. Set USB flash drive to the First bootable device
Once these three tasks are completed, now you should be better equipped to protect your computer even when the manufacturers no longer sends any updates due to the age of the computer.
So here we start the process of how the Microcode Boot Loader works on your system:
Step-1: Download and Install
1. Firstly, you have to download the Intel Microcode Boot Loader tool. For this, you need to visit the Official website. While the download size is always under the 13MB, so it might not take a very long time to complete it.
2. After completing the downloading process, you need to format the USB flash drive by clicking on This PC on your computer system.
3. Then, right-click on it to locate the device.
4. Next, select Format option.
5. After that, select the FAT32 system and follow the on-screen instruction.
Step-2: Create Bootable Drive
1. To Create a bootable drive, you need to follow the below given steps:
2. Click to Run the Install.exe file.
3. Then, follow the on-screen instruction to installing the tool on your FAT32 formatted USB flash drive.
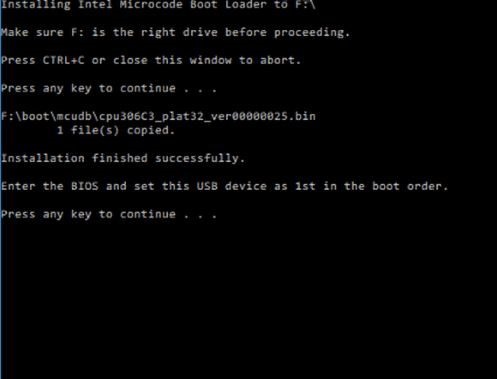
Step-3: Set USB flash Drive to First Bootable Drive
Firstly, restart your computer system.
If your machine is new, then make sure about you enter the BIOS and UEFI.
Now, set the USB flash drive to be a default bootable drive on your system settings. This means that whenever Windows 10 is restarted in the future, then it always attempts to boot first from the device.
Now, when everything is running and up, then you should understand that the Microcode will always be updated after every fresh reboot, as the USB flash drive with the Intel Microcode Boot Loader installed is plugged in.
Ricky johnson is a Microsoft Office expert and has been working in the technical industry since 2002. As a technical expert, Samuel has written technical blogs, manuals, white papers, and reviews for many websites such as office.com/setup
So, here the questions arise that how does anyone protect their Intel Motherboard from the attacks of today and those of the future? To solve the problem of Motherboard, recently we find an amazing tool called as Intel Microcode Boot Loader. However, we all know that newer computer is much proficient in protecting hardware from any infections. So the Intel Microcode Boot Loader tool will be more useful for all the older computers where any manufacturer no longer offers security updates.
Always remember that the Microcode Boot Loader is completely based on the Intel BIOS Implementation Test Suite and will only work properly from a USB drive which is FAT32 formatted.
Let’s discuss here how the Intel Microcode Boot Loader works to protect the Mother board of your computer system.
Steps to Protect Motherboard with Intel Microcode Boot Loader
Before running the program, you need to do the below-given things:
1. Download and Format
2. Create Bootable Drive
3. Set USB flash drive to the First bootable device
Once these three tasks are completed, now you should be better equipped to protect your computer even when the manufacturers no longer sends any updates due to the age of the computer.
So here we start the process of how the Microcode Boot Loader works on your system:
Step-1: Download and Install
1. Firstly, you have to download the Intel Microcode Boot Loader tool. For this, you need to visit the Official website. While the download size is always under the 13MB, so it might not take a very long time to complete it.
2. After completing the downloading process, you need to format the USB flash drive by clicking on This PC on your computer system.
3. Then, right-click on it to locate the device.
4. Next, select Format option.
5. After that, select the FAT32 system and follow the on-screen instruction.
Step-2: Create Bootable Drive
1. To Create a bootable drive, you need to follow the below given steps:
2. Click to Run the Install.exe file.
3. Then, follow the on-screen instruction to installing the tool on your FAT32 formatted USB flash drive.
Step-3: Set USB flash Drive to First Bootable Drive
Firstly, restart your computer system.
If your machine is new, then make sure about you enter the BIOS and UEFI.
Now, set the USB flash drive to be a default bootable drive on your system settings. This means that whenever Windows 10 is restarted in the future, then it always attempts to boot first from the device.
Now, when everything is running and up, then you should understand that the Microcode will always be updated after every fresh reboot, as the USB flash drive with the Intel Microcode Boot Loader installed is plugged in.
Ricky johnson is a Microsoft Office expert and has been working in the technical industry since 2002. As a technical expert, Samuel has written technical blogs, manuals, white papers, and reviews for many websites such as office.com/setup
Comments
Post a Comment